If you’re new to the wide and wonderful world of grinding. You might have some questions as to what kind of grinder you should get. The two most common types are the angle grinder and the bench grinder.
Angle grinders and bench grinders are similar in that they are both rotary tools which spin an abrasive disc or wheel. However, that is pretty much where their similarities end. They do have some overlap in their uses, but if you want to have a well-equipped shop, you should really have both.
However, if you are someone who isn’t concerned with setting up a shop and wants an all-purpose grinding tool, then you should probably start with an angle grinder.
But it really comes down to what job you are trying to do, and which tool will complete that job safely and easily.
To help you learn more about these tools, and which is right for you, I’ve covered all I know about angle and bench grinders in the following guide about angle grinder vs bench grinders, including grinder uses, setup sizes, differences, safety issues, and much more.
Note: This is a long guide, so feel free to use the table of contents below to scroll down to specific sections.
What is an Angle Grinder?

An angle grinder is not just a portable version of a bench grinder. They are designed to execute a surprisingly broad range of tasks, on many different materials.
There are many different discs and wheels available for grinding, but also for cutting various materials like steel, aluminum, and even diamond wheels for stone and concrete.
There are also specialized discs for smoothing and polishing.
What Size Angle Grinder Do You Need?
Angle grinders come in many different sizes accepting different sized wheels and discs. The two most common sizes of angle grinder are 4-½” and 5”. These sizes are quite versatile and are great for most of your cutting and grinding needs.
If I could only have one angle grinder it would be in that size range.
Up to 5” they are powerful enough for most jobs but small enough for one handed operation. The main thing you sacrifice with a 4-½” or 5” angle grinder is cutting depth. What you gain is ease of handling and more finesse for finer work.
I would recommend either of these two sizes for light grinding and cutting of metal ⅛” thick or less.
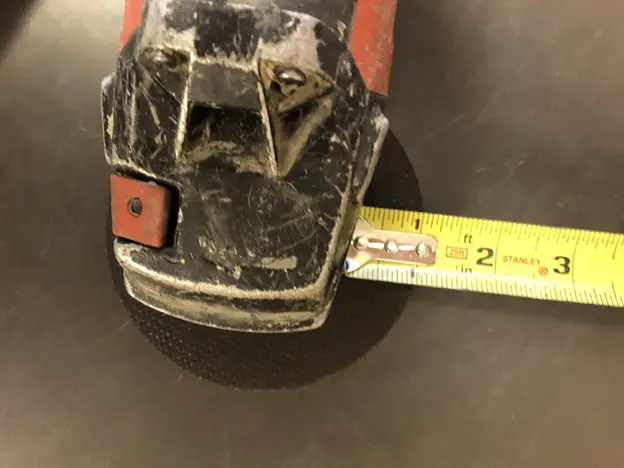
Below you can see an a 4-½” cutting disc on an angle grinder.
Notice that the disc only has a 1” cutting depth:
You could also look at 6” angle grinders if you need a larger grinder for heavier cutting or grinding needs. The larger diameter disc gives you more cutting depth, good for harder to reach areas.
They are also better at cutting thicker metal when equipped with a cutting disc. I’d recommend this size for cutting steel or aluminum between ⅛” and ⅜”.
The 6” angle grinder is really a two-handed tool. They are noticeably bigger and more powerful than the smaller grinders and can get away from you if you’re not careful.
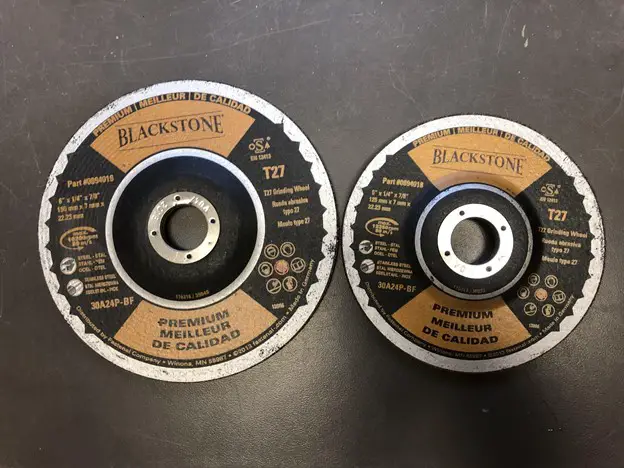
There’s actually a big difference between an 5” and 6” grinding wheel in terms of size. I know it’s just an inch.
But when you are dealing with diameters it looks like more.
Here’s a visual comparison:
If the 5” or 6” aren’t cutting it you could step up to an 8” grinder. 8” grinders are beasts! definitely only to be used with two hands. This size makes short work of heavier steel a good option for ¼”-⅜” steel when you have a lot of material to cut or grind.
If an 8” grinder isn’t enough, you need to look at other options such as a demo saw or oxy acetylene torches.
What are the common uses of an Angle Grinder?
Sharpening tools with an angle grinder
One of the most common uses of an angle grinder is to sharpen tools. This is also one of the uses where a bench grinder might be a better choice. But when convenience is the more important factor, an angle grinder will serve the purpose.
If you are going to use it to sharpen tools like lawnmower blades, axe heads and similar items it’s important to secure the item to be sharpened so it doesn’t slip around.
I recommend securing these and other tools that need sharpening in a vice. This is smart from both a safety and quality of work perspective.
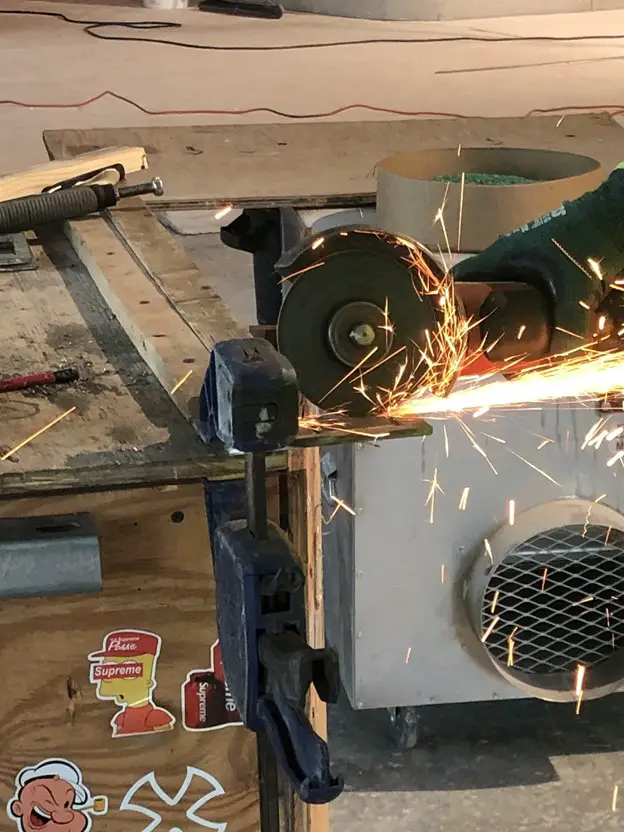
Grinding with an angle grinder
Who would have thought you could grind with an angle grinder? Well, you can and they are great at it.
They are super handy when fitting metal parts together and when you need to shave a small obstruction down for a better fit.
When metal-working, they are an indispensable tool and one of the most used pieces of power equipment.
Any job that involves metal work from commercial iron working, to automotive, to metal sculpture, you’ll find an angle grinder to be one of your favorite tools.
Using an angle grinder for welding work
If you’ve done any amount of welding you know how important an angle grinder is for that job. They are great at smoothing out rough welds before a second pass or before painting.
They are also handy for cleaning paint or rust from surfaces before welding so the weld will take better.
Angle grinders are great for grinding bevels on steel before joining two pieces together. And for those of you who are new to welding, they are the tool to use when gouging out a bad weld before trying again.
Very important!
As they say “show me a bad welder and I’ll show you a good grinder “
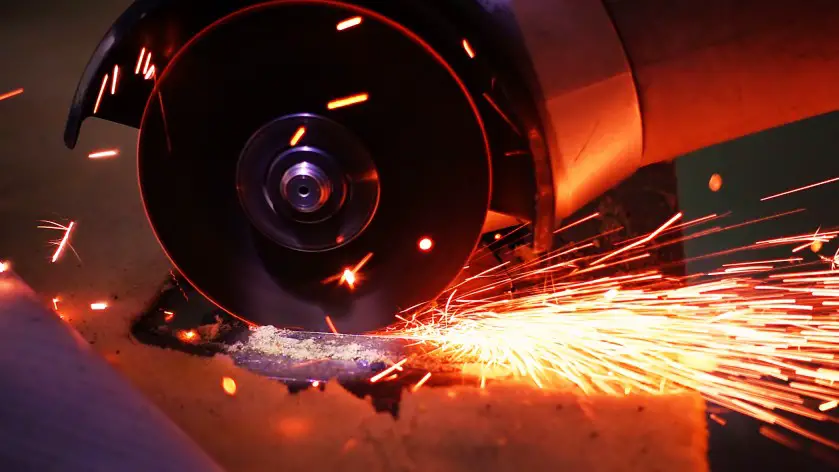
Cutting sheet metal with an angle grinder.
One of the jobs that You will want to try an angle grinder on, is cutting sheet metal. Angle grinders equipped with a cutting disc do a great job at cutting sheet metal of various thicknesses.
They do a great job of cutting sheet-metal especially when it comes to making notches and other more intricate shapes.
They are also a great tool to use when cutting various types of metal. A cutting disc like the one shown below can cut almost any kind of metal both ferrous and non-ferrous including, aluminum, steel, stainless steel, galvanized and tins and other alloys.
If you used a toothed cutting tool like a skill saw or table saw, you have to be careful that you match the blade to the material. With these cutting discs, you can move from one material to another without changing blades.

One thing to note, though, cutting sheet metal with a grinder can be loud! Like really loud. Hearing protection is a must.
Another serious safety concern is the disc shattering while cutting. I’ve had this happen and it’s not fun! These cutting discs are thin only .040” to .060”. If you try to cut a curve and bend the disc in the cut it can shatter sending pieces flying everywhere.
It can also bind in the cut pulling the tool out of your control.
Please remember to keep the discs straight while cutting, and always inspect the disc for cracks chips or other damage and throw them away if you find any signs of damage.
Cutting Concrete and Stone With an Angle Grinder
You can also cut all types of masonry with a diamond wheel on your angle grinder. These are great for concrete, concrete pavers, natural stone and even tile.
Again, they are especially adept at making notches and other odd shaped cuts that would be difficult with a larger masonry saw. One thing to note is with the limited cutting depth you may have to cut from both sides on thicker stone or pavers.
You will also have to either wet the stone while you cut or have a vacuum set up to suck up the dust. Really though, wetting the stone is best.
I find that a water bottle with a small hole in the cap works good if you have a friend squirt the water at the wheel while you cut.
Silica is nasty stuff and if you are going to cut concrete or stone all day protect your lungs and only work on wet stone.
Sanding or polishing with an Angle Grinder
An angle grinder can also be used to sand, smooth and polish metal and other surfaces. When I first started metal working the go to wheel for this task would be a wire wheel. And they still work great, especially for heavily rusted, corroded or painted surfaces. A wire wheel will quickly get down to bare workable metal.
Wire wheels are aggressive, and if you never wear eye protection you damn well better when using one. They constantly shed wires especially when you apply a little extra pressure ir are working on corners or edges.
In the last few years, I discovered these flap sander wheels for angle grinders. I’m not sure how long they’ve been on the market but they are awesome!
Wire wheels are still king for heavy rust and paint which can gum up the sanding flaps. But when it comes to fine finish work, these flap discs are the best!
They come in different grits like sandpaper, they work on metal, wood or just about any other surface you can think of.
I’ve used the heavy grits for taking 1/16” off of an aluminum door, and the fine grits I’ve used to replicate a brushed finish on stainless steel. Do yourself a favor and try them out.
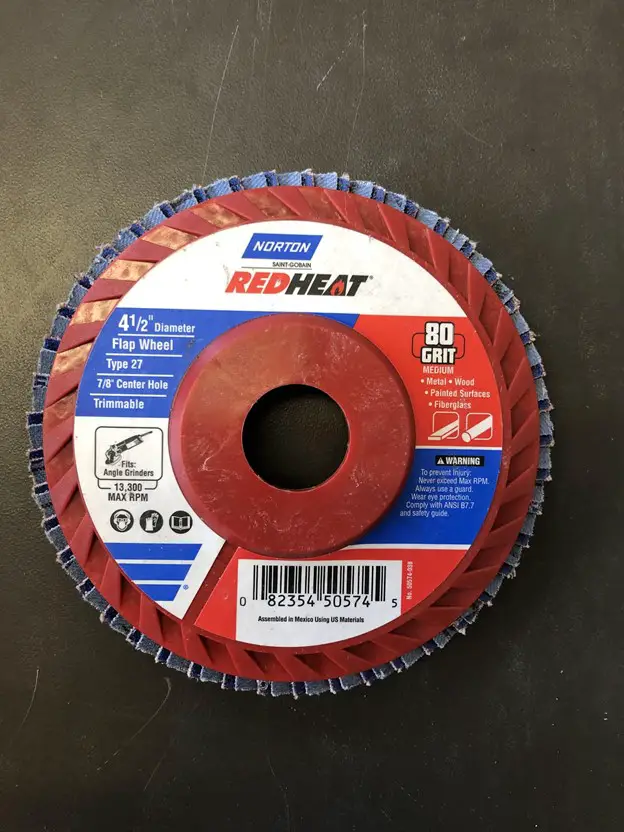
If you can’t tell, I’m a big fan of these things.
What is a Bench grinder?
A bench grinder is a stalwart in just about any shop, metal working or otherwise.
They are a simple machine that has changed very little over the years.
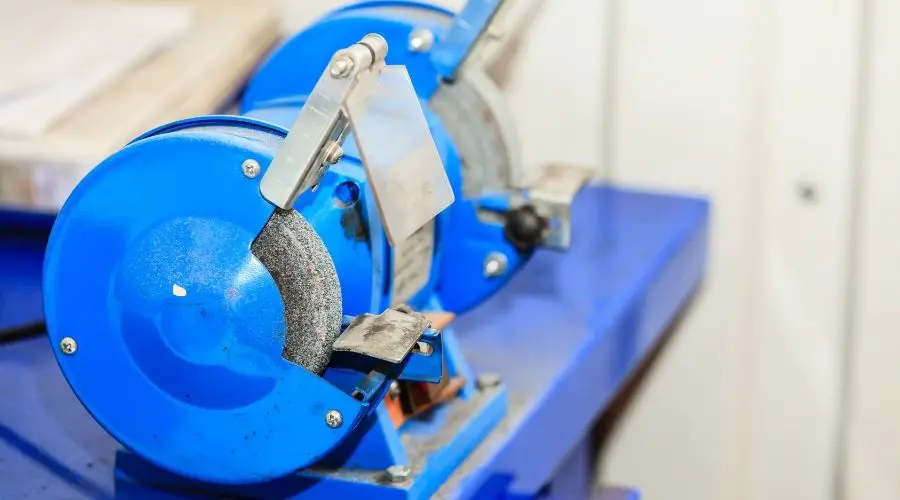
They consist of an electric motor enclosed in a housing with an arbor on either side so that you have two grinding wheels to work with.

Types of wheels for a bench grinder
Usually, a bench grinder will be set up with two grinding wheels. One of the wheels will be a course grit, and one will be of a finer grit.
This is a good setup for a sharpening station. You may also see one side set up with a grinding wheel and the other side with a wire wheel.
This is a great setup for general metal work if you deal with a lot of rust and dirty iron.
How to mount a Bench Grinder
There are two basic types of bench grinders you’ll see: bench mounted and pedestal mounted.
Bench Mounted grinders
Most of the newer bench grinders you’ll find are made to be bolted securely to a bench. It is important to pick a sturdy bench or worktable to mount your bench grinder.
A bench grinder creates a ton of vibration, you need to either have a very heavy sturdy table or one that is fastened securely to a wall or the floor. Make sure that your grinder has rubber feet before you bolt it down. If it doesn’t, find a heavy piece of rubber to secure between your grinder and the bench. This will help to absorb vibrations.
Otherwise, any other items you have on the bench will dance around and possibly fall on the floor once the grinder gets cooking.
I prefer to through bolt a bench grinder to its work surface. Be sure to use a heavy bolt with both flat and lock washers for through bolting the grinder to the bench. Use nylock nuts as an extra precaution, bench grinders have a nasty habit of vibrating nuts loose.
An alternative to through bolting would be using a wood lag.
Just be sure to use a heavy lag and check for loosening occasionally so you don’t have any unpleasant surprises when working the grinder.
Pedestal mounted bench grinders
Most of the older bench grinders were mounted on a pedestal that would be bolted to the floor. Many of these old machines are still in good working order. Not much to break on these simple machines.
When bolting these machines to a concrete floor, I’d recommend using a ½” x 4” concrete wedge anchor. A 3/8” wedge anchor might be enough, but why mess around. Overkill is underrated.
If you’re mounting the pedestal to a wood floor, I’d use a ½” wood lag as long as needed for full thread embedment in the floor. I’d also try to hit a floor joist, and if that doesn’t work and you have access beneath the floor, I’d either add blocking beneath the floor or use through bolts.
Bench grinder accessories
Bench grinders often come with a few basic accessories to make your life less of a grind. (Sorry I’d been holding that one in for awhile).
These can include adjustable work rests, a cup for water to cool hot work, adjustable see-through guards mounted above the wheel to stop sparks and other debris, and integrated lights help illuminate the work so you can see what your doing.
Not all bench grinders will come with all of these features, as a matter of fact most new ones don’t. You can however add many of these if you feel it’s necessary.
Adjustable rests on bench grinders
Bench grinders also benefit from having a small adjustable shelf or guide mounted below the wheels.
These act as a rest and help to steady the piece you are grinding. They also help to maintain a consistent angle when sharpening a tool or blade.
They are also an important safety feature as they keep the work from getting sucked down between the grinding wheel and the metal housing.
The rests should be adjusted so that the gap between the wheel and the rest is less than the thickness of the piece you are grinding.
You should never operate a bench grinder without these rests in place for that reason.
Cooling cup
Some of bench grinders also come with a small metal cup attached.
This is to fill with water or oil to cool the work piece as you grind. It is important to keep the metal cool especially with heat treated metals.
If you over heat a drill bit or chisel you will ruin the temper of it causing the cutting edge to become brittle. You’ll know when this happens because the steel will turn blue.
If you dip the steel in the water occasionally, you can reduce this risk. Above all, you must be careful that you don’t overheat your workpiece.
If your bench grinder doesn’t come with one of these cups, an old soup can set nearby is all you need. I’ve noticed these more on pedestal mounted grinders then bench mounted models.
Lights on bench grinders
Some bench grinders come equipped with onboard lights. You really can’t have too much light when using a bench grinder.
This is particularly true when sharpening small items like drill bits. It takes a keen eye to sharpen drill bits extra light is always welcome for this task.
If your bench grinder doesn’t come with an onboard light I’d suggest buying an adjustable shop light to mount above the work station.
What are bench grinders used for?
")
Bench grinders are good for a number of common tasks around the shop. Though not as versatile as an angle grinder, bench grinders are used to sharpen tools, clean rusted or corroded metal, and shape metal to name a few.
Although it may seem like only a few uses, set one up in your shop and you’ll see that you use it more frequently then you’d probably imagine.
Sharpening tools with a bench grinder
Alright, sharpening tools might be the main reason to own a bench grinder. I can’t think of a tool that does as good of a job as quickly. Although you probably won’t want to take your best wood chisels or pocket knife to this aggressive machine. Things like lawnmower blades, axes, mauls, machetes, and claymore’s are quickly and easily sharpened with a. Each grinder.
How to sharpen tools with a bench grinder
Sharpening with a bench grinder is fairly easy once you get the hang of it. It’s also fairly easy to mess up an edges tool with a bench grinder if you don’t know what you’re doing.
They are an aggressive machine capable of removing large amounts of steel fast. That’s why you should start with a less expensive tool to practice. An old dull axe or a beat up old machete is a good place to start.
The first thing you need to do is pick an angle and stick with it. Start with the more course grit wheel and try to either match the existing angle of the edge of create a new one.
A steeper angle can be sharpened to a razor edge easier than a shallow angle.
A less steep angle will be stronger and less likely to roll over when used under hard conditions.
Once you have established an angle you like, alternate from one side to the other, being careful to not over heat the edge.
Go slow, especially at first. As you grind most of the sparks will be shooting down behind the blade towards your feet.
Look for tiny sparks that appear on the top face of the edge and shoot over the side of the blade that’s facing you.
When you see these sparks riding the edge and coming to the top of the blade, you’ll know that you are grinding on the very edge and creating a burr. That’s good! It also means it’s time to flip the blade and grind the other edge, until you see the same sparks.
(This is true with double bevel blades like axes and machetes not true for single edge blades like lawnmower blades and chisels).
Once you’re happy with the look and feel of the edge on the course wheel, switch to the fine wheel and do the same thing. You’ll find that you spend less time with the fine wheel than the course one, as the course wheel shapes the edge and the fine wheel dresses it.
Sharpening drill bits with a bench grinder
Ok, it’s not easy to sharpen drill bits with a bench grinder, it takes a fair amount of practice to get good at it and your first attempts will probably be rough. In fact, you’re likely to ruin your first dozen or so attempts.
I’d start with a medium sized drill bit, not too big or too small. A quarter inch bit is a good candidate to learn on.
Also start with bits that are dull but not toasted. Pick bits to learn on whose edges are only slightly rounded but whose edge angles are intact. That way you can get a feel for the proper angle to hold the bit and get used to what your looking for as you sharpen.
It’s best to get a big pile of dull bits and just keep trying, sharpen a little and then try to drill with them.
You’ll get it, just don’t give up. Also, you have to be really careful to not burn the bits. If they turn blue or purple and gold it’s probably ruined.
But what do you have to lose a bunch of bits that you’d have thrown out anyway? What you gain will be knowledge and skill that few people have these days and in the long run you will save money by not having to replace buts as often.
On a personal note, I actually prefer to sharpen with an angle grinder using the flat surface of the disc and resting the bit on the guard to hold the angle. It might not be the best way, but it’s how I learned and it works for me.
Try it if you struggle with the bench grinder method.
Cleaning metal with a bench grinder
If you run into some dirty rusty crap that you need to turn into something, a bench grinder can be helpful in getting you there.
It’s jobs like this that you probably want a wire wheel on one side of your bench grinder. They do a great job of getting into the pits and grooves in metal and cleaning down to the usable iron.
Be careful with them though, those wire wheels can be grabby. They’ve been know to rip things out if people’s hands, use extreme caution especially around edges.
Bench Grinder and Angle Grinder Safety
You can’t be too careful when using grinders. They spin abrasive wheels and discs at extreme speeds. They are made to cut through steel, they will do a number on skin if you’re not careful.
Grinder safety guards
Angle grinders come with adjustable guards, bench grinders come with removable side plates.
Do not operate your grinder without these pieces affixed. Particularly with the angle grinder there’ll be instances where you may need to remove the guard to get in hard to reach places. If you do, you’re doing this at your own risk.
The guard is there to protect your hands from accidentally coming into contact with the spinning disc and also there to deflect the flying particles if the disc breaks.
Eye protection when grinding
Probably the most common injury I’ve seen while grinding is to the eye. Most of the time it is just a piece of grit of dust that gets around a pair of safety glasses. But eye injuries from grinders can be catastrophic!
Cutting wheels can break apart sending large pieces if thx disc flying. Sparks will fly around like burning little projectiles. Pieces your working on can be thrown back at your face, any number of bad things can happen.
I would recommend a full face shield and safety glasses.
Keep them both clean so that your vision isn’t obstructed. A full face shield is you’d best protection. It’s not just your eyes you’re trying to protect.
If you catch half of a broken cut off wheel in the cheek, you’ll see why safety glasses aren’t enough.
Fire safety when grinding
Grinding ferrous metals like steel and iron produced sparks. These sparks can easily start a fire if you are grinding near combustible materials.
Grinding that produces sparks is classified as hot work by OSHA and requires a daily permit in most commercial construction projects.
Be sure to remove any combustible materials and have a fire extinguisher on hand when you are grinding materials that create sparks.
Also be aware that flying sparks will burn into many materials including glass! That’s right; the sparks from a grinder are hot enough that they melt into glass. You’ll know if you rub your hand across the glass and it feels grit. Those are sparks burned in leaving tiny balls of steel in the glass.
These might be difficult to notice at first, that is until these tiny balls start rusting.
Hand safety when grinding
As mentioned in the previous section, grinding is hot work. You should always wear gloves that can handle the heat.
If you’re welding you should have heavy welding gloves, and these should also be worn while grinding as they will offer your hands the most protection.
For most grinding operations, a good pair of leather gloves are recommended. Cloth or synthetic gloves will not hold up, at the very least the sparks will burn holes in them at the worst they could catch fire.
Stick to leather gloves for grinding.
Respiratory safety when grinding

Whenever you are grinding or cutting metal with an abrasive wheel or disc, you are introducing small metal particles and dust from the cutting or grinding disc into the air.
You don’t want to breath this stuff!
You should wear a dust mask at the very minimum, or even better, a cartridge respirator.
You can do permanent damage to your lungs and also introduce heavy metals into your bloodstream.
Take this seriously!
Grinder Safety, Clothes
As with any power tool, you should never wear loose fitting clothes when using a grinder. Loose clothing or hair can get caught up by the wheel or disc having disastrous results.
You also need to make sure that what your wearing doesn’t catch fire too easily. Seems far fetched right?
Well, I can tell you from experience that I’ve seen it happen more than a few times.
One of the worst offenders is actually the safety vests that are required on many construction projects. They don’t so much catch fire, more like smoldering and melting. Either way, not good!
If you smell smoke while grinding stop and look around, it might be you!
FAQ’s About Angle and Bench Grinders
Can I cut stainless steel with an angle grinder?
Yes, you can cut stainless steel with most cutting discs on an angle grinder.
You should note that cutting stainless steel with an abrasive wheel creates a lot of heat. This causes the steel to turn blue and gold fast.
You have to go slow and watch out for this particularly with finish material. You should buy cutting wheels made specifically for cutting stainless.
These work well to minimize bluing, but you still need to be careful.
Can you cut aluminum with an angle grinder?
Yes, you absolutely can cut aluminum with an angle grinder using a cutting disc. These discs do a great job cutting aluminum sheet metal and aluminum angle of modest thickness. ⅛” and less these blades work great anything thicker can become a little tedious.
In thin sheet metal, the angle grinder will leave a clean cut on the top surface where the cutting disc enters.
You will have some filing to do on the reverse side where the disc exits the cut.
Can I cut curved shapes with an angle grinder?
You can cut gradual curves in sheet metal with an angle grinder, but it’s probably not the best choice.
A pair of power shears or a jigsaw would work better in most cases.
If you do try to cut a curve with an angle grinder, be sure that you don’t flex or twist the cutting wheel too much while you cut.
If you do, you run the risk of binding and shattering the disc.
Instead, use as little of the disc’s depth as possible while making your gradual curve that way there’s less chance of the disc binding.
Are battery powered angle grinders good?
Yes, a few years ago, I would probably have had mixed reviews on this one, and in certain applications I still prefer a corded angle grinder.
But you can’t deny the convenience that cordless tools provide.
Cordless angle grinders have come a long way. When they first came out they tended to be underpowered and they used up battery life super-fast.
However, the newer ones on the market really work great.
With the Lithium ion batteries available today they are more powerful and the batteries last far longer.
I’d still suggest that you have a corded angle grinder in your shop but absolutely the cordless models are worth the investment.
What are grinding wheels made of?
Grinding wheels consist of three components:
- Grit or grain – this is the abrasive in the cutting wheel. The grit determines how course or aggressive the cutting wheel is. Common materials used for the grit are silicon crabide, aluminum oxide, zirconia alumina, ceramic alumina or a mix of these. Each grit has different properties and performance for various applications
- Bond – this, as the name implies, is the glue that hold the wheel together. The bond can be made from resinoids, shellac, rubber and glass.
- Fiberglass – this is the structure of the wheel. The fiberglass gives the wheel is strength and integrity
Conclusion
We’ll be updating this guide to angle and bench grinders on occasion, so if you have questions or feel we left something out, let us know and we’ll try to address it via an update to the post.
Thanks and happy making!