CNC plasma tables are incredibly versatile and can provide a wide variety of different potential applications.
Plasma cutting tables are one of the most commonly used and efficient tools for cutting materials quickly and efficiently.
CNC plasma cutting tables are perfect for a variety of manufacturing and construction applications, as they provide a great way to cut large, heavyweight materials with ease.
These tables are computer automated, which allows for a high level of accuracy in each and every cut that is performed, every time.
These tables are used in engineering, agricultural, construction, manufacturing and other prominent industries.
CNC plasma tables are a great addition to any shop, as it provides flexibility in its ability to perform a number of functions, and will inherently help save time, money and material!
How Much Does It Cost To Make?
Making your own CNC plasma table is a great alternate option to buying a brand new table, as they can range from 20,000 dollars to well over 50,000 for a high-quality, industrial-grade unit.
It is possible to make your own CNC plasma table for much cheaper by purchasing and using your own tools and materials and following a good set of instructions.
These DIY CNC plasma table projects can cost less than 1000 dollars.
Typically, however, making a decent quality table will typically cost upwards of 2000 dollars, with everything included.
Making Your DIY CNC Plasma Table
We will provide a step-by-step walkthrough for how to build your very own DIY CNC plasma table, including a list of required tools and equipment, as well as a guide.
List of required tools & parts
- HG20 20mm Linear Rail Guide Actuator CNC 1500mm
- HG20 20mm Linear Rail Guide Actuator CNC 750mm
- 3PCS Nema 23 Stepper Motor
- Nema 23 Stepper Motor
- SainSmart CNC Micro Stepping Motor Driver
- DC 24V 15A Power Supply
- R55 Plastic Open Type Cable Wire
- MR12 12mm Linear Rail Guide 100mm
- 8mm to 10mm Shaft Coupling
- 400mm 8mm Lead Screw ACME
- 4 Pack Caster Wheels 4 inch
- 5 axis CNC Breakout Board
- 12 Pack of Micro Limit Switches
- Metal Gear Rack -20 Pitch 6ft (5174T21)
- Metal Gear 20 Pitch 15 Teeth (5172T11)
- Compression Spring 2″ Long 0.875″ OD, 0.635″ Pack of 6
- Zinc-Aluminum M5 x 0.8mm 20mm Thread Pack of 50
- Zinc-Aluminum M5 x 0.8mm 12mm Thread Pack of 50
- Zinc-Aluminum M5 x 0.8mm 16mm Thread Pack of 50
Step-by-step guide
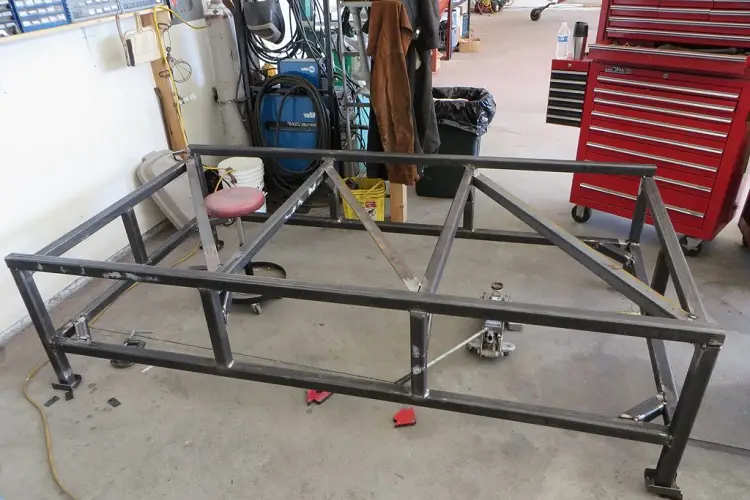
The following guide outlines the process of creating the mainframe for your DIY CNC plasma table.
Start off by cutting the 4 x 2 x 3-inch tubing, followed by the 2 x 2 x ⅛ inch tubing.
Next, cut the 4 x 4 x ⅛ inch tubing.
Once everything has been properly cut, it is a good idea to power wash all of your pieces to remove any grease and prepare it for welding. You should also grind down the burrs on each piece that have been created during the cutting process.
Now it is time to start the welding process.
Set your welder to 240 volts of power, with settings of 250 wire feed speed and 18 volts will work well for the thickness of your metal.
Weld your pieces together while keeping everything as square as possible while keep the top and side lineups nice and flush.
You may add extra pieces in order to add support and make the frame stronger.
Now that your top frame of the table is completed, you can move onto the legs and the table itself.
Weld the legging system of your CNC table, double-checking all measurements to make sure that they will be of even lengths and maximum stability.
Add your cross beams to the leg system, as well as the legs that will be used to mount the casters for your table.
Stand the sides of your table up and add your cross-beams in order to square up the frame of your table.
Be sure that you are working on a level surface so that your table does not end up being uneven and wobbly!
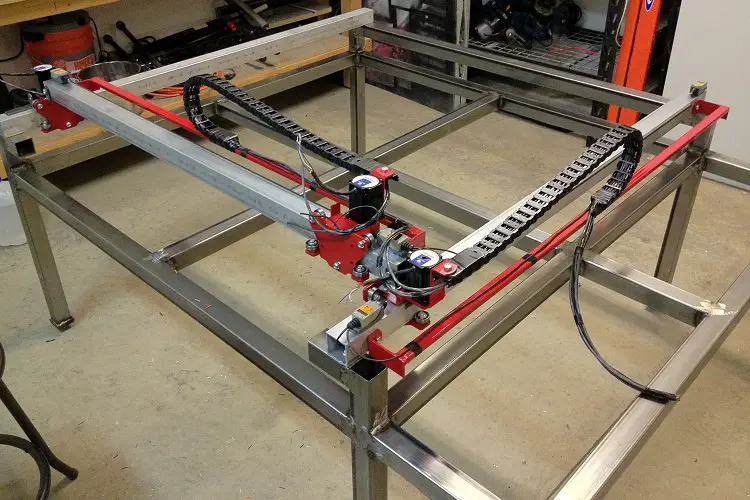
Add your gantry frame and use a metal grinder if needed to have it fit properly.
Next, add your middle cross-beams which will help lock the gantry frame in place. In this step, you will also add the middle cross-bard between the cross-beams for additional support.
Once these pieces have all been placed, weld everything together nicely and use your metal grinder for any irregular areas that need to be made flush.
Next, it is time to cut the miscellaneous parts required for the gantry and motor mounts for your CNC plasma table. You will likely need a plasma cutter to complete these cuts effectively.
Once your parts have been cut, grind down the edges to make sure they are not too sharp.
Next, print a 1:1 scale of your table template drawing in order to find exactly where to drill the necessary holes as well as where to weld the bolt bracket on your pieces.
Tack on the tensioner brackets as needed, and then proceed to add the tensioner bolt mounts. Make sure that everything fits and works properly before moving onto the next step.
Weld your brackets onto the pieces, and then proceed to install your linear rails by clamping them onto the side while ensuring proper accuracy.
Next, take the sides of the gantry and bolt them to the linear bearings on the rail. Make it as perpendicular to the top of the table as possible.
Measure the distance between your two sides and then proceed to cut your gantry cross piece to size as needed.
Next, weld the cross beam on while making any minor adjustments as needed to make sure that it is exactly where you want it. Check to make sure that the gantry is parallel with the top of the table, and that the side is perpendicular with the top of the table.
Once everything is in place, tack it up and then proceed to weld it all together. Grind down your welds to make everything look nice and clean.
The final step is to tack and weld on your plates to the legs of the table, which is where you will attach your casters for the wheels.
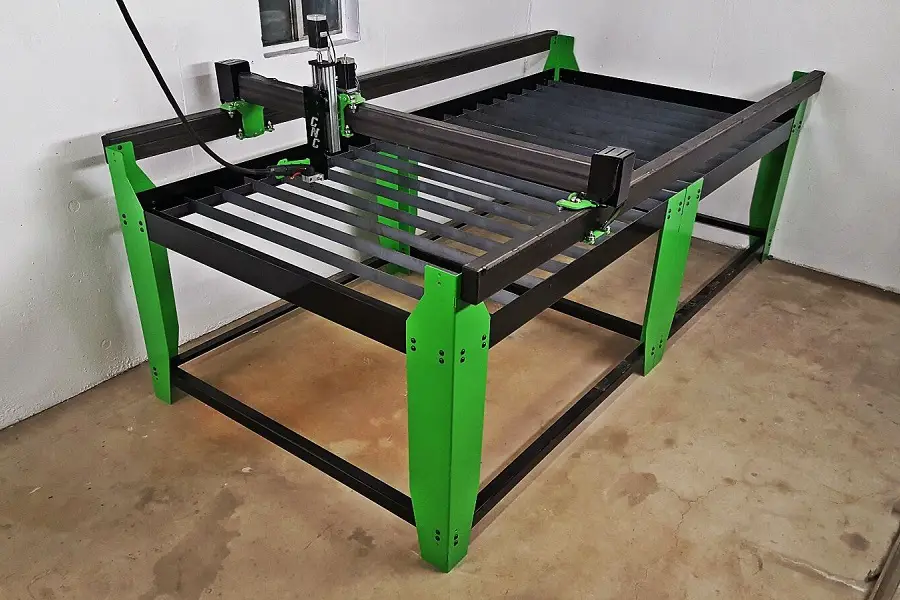
You have now completed your DIY CNC plasma cutter table frame!
To see a video reference for this build, visit here.
Does A DIY CNC Plasma Table Compare To A Professional Table?
The difference between a DIY CNC plasma table and a professionally made CNC plasma table will depend on a number of factors.
If you choose to build your own plasma table, the resulting quality will largely depend on your own skills, knowledge and overall expertise. The process involves a lot of cutting and welding procedures that need to be performed with utmost accuracy to ensure a good final result.
Professional CNC plasma tables (like these 5×10 models) will be the most reliable option, and will also save you a lot of time and effort as they will come fully built and ready to go right out of the store. However, these professional tables can be very expensive and may not be a viable option for people who do not have the required budget.
Building your own CNC plasma table will inherently save you a significant amount of money, as purchasing your own parts and doing the work yourself is inherently the cheaper option.
However, if the table is not built properly it may actually end up being more of an investment, in the long run, to continuously fix and maintain a faulty table.
The trade-off between a DIY plasma table and one that is professionally built is important. You may save money initially by building one yourself, but the quality and longevity of the table will depend entirely on your own set of skills and the availability of proper tools and materials.
It is also important to consider the time investment that is involved with taking on a complicated project like building your own CNC plasma table.
This kind of project can take many hours to complete, especially for someone who is not familiar with the tools and procedures involved.
In the end, consider all of these factors before deciding whether to build your own plasma table or simply purchasing a professionally made plasma table instead.
Conclusion
In this informational article, we have explored the idea of creating your own DIY CNC plasma table.
We have discussed everything from versatility to the potential cost of building your own table, as well as provided a step-by-step guide that highlights the major parts of the process.
Finally, we talked a little bit about the associated factors involved with taking on a DIY plasma table project, in comparison to simply purchasing a professionally manufactured table.
Thanks for reading, and good luck with all of your CNC plasma table endeavors!
References